|
While I have had a hard time setting film dates with my friends, I have been working on everything else I possibly can, from learning the Video Copilot lightsaber plugin and working on intros and credit rolls, in the obvious Star Wars fashion. We have also finished and perfected the choreography, and practiced enough to know the beats of the fight and know where our opponent is going. Here is the polished blocking doc and the intro/credit scroll. Choreography and Blocking
0 Comments
So I think that because I have never filmed something or made a short film before, I'm treading a lot of new ground and going into a lot of new territory. I'm having a lot of fun with it right now, and being able to actually go through and produce a product. Being able to express myself creatively is awesome, and practicing fighting with lightsabers is probably one of the more nerdier things that I've done. So far I've finished blocking and choreographing the fight, and have begun to develop the story and how it will be shot, including the infamous Star Wars crawl and Cantina Band for the credits. This is the choreography my friend and I wrote. Choreography and BlockingSo for this project, I haven’t had much experience with filming things in general, I’ve had a lot of ideas and plans, but nothing I can ever set in motion, so this project is finally helping me get into the swing of things. I want to make this lightsaber fight as accurate as possible, so I’ve been reading up on fighting with swords. I learned the basics of how to fight with a sword, then I defined each of the 7 lightsaber forms that are in the Star Wars universe, messing around with them and seeing which ones work with the fight I’m doing.
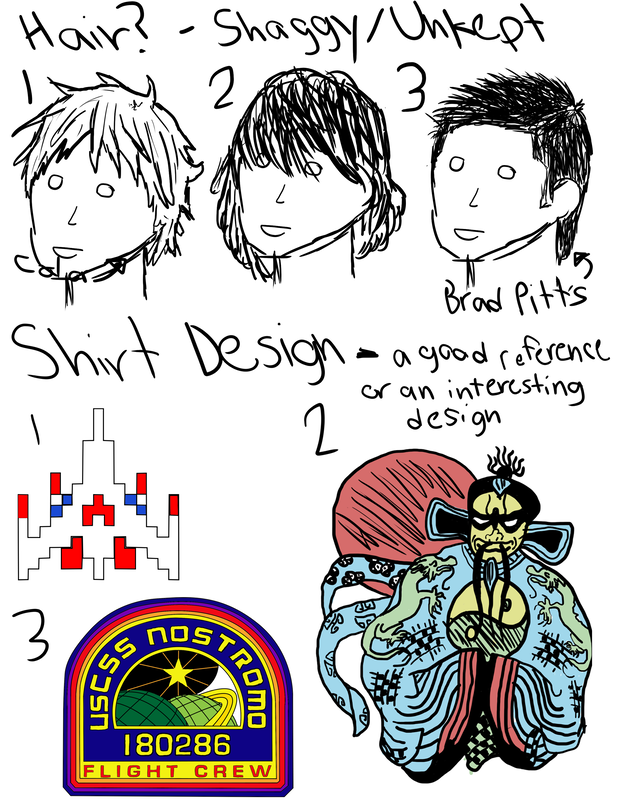
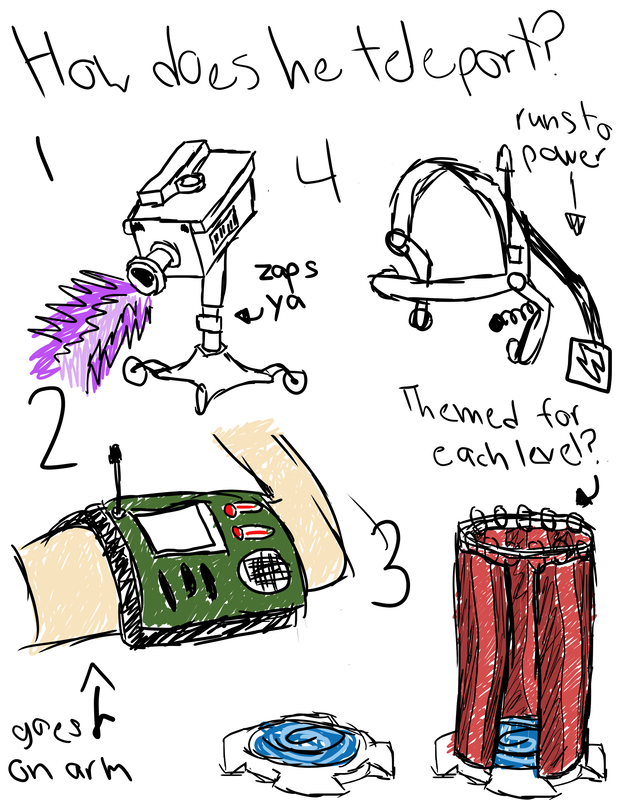
Fighting With A Sword: https://www.youtube.com/watch?v=Y_Y6ZDdsOvs The 7 Forms Of Lightsaber Combat: https://www.youtube.com/watch?v=WP7sbwbIzks Basics To Each Lightsaber Form: https://www.youtube.com/playlist?list=PLdcRTCxAZ53Wed6Y 79JXwTbw2sHPmFgHx The project we are working on is designing a narrative-based video game, and we have to make concept art to go with our idea, to construct how we want the game to look and certain design choices that we had to make. The game I made wasn't as narrative-based as it was meant to be. My game is about a game tester who is testing out a new type of game console, one that actually transports you into the world you're playing. In this game, a bunch of the test worlds are based on movies to make them easier to build and experiment, so the game developers don't have to worry about creativity or designing new concepts, just the functionality of the console. Your job is to complete all of the levels, but the catch is that the system isn't fully functioning and breaks down while you're in it. You have to repair the console in different ways while going through the movie-based worlds. My concept art on the left is figuring out how I want my character, Frank Homer son, to look. On the right are iterations of the teleporter that Frank will use to get in and out of the console, and how I wanted that to look.
Constraints are used to narrow down what you want to focus on in your iterations. For the hair, my constraint was trying to make my character look unkempt without looking gross or unappealing. For the teleporter, my constraint was that it needed to only be accessible when the story needed it to, and it Frank also needs to communicate with the developers. The handheld versions were mainly meant for communication, while the stationary ones were meant to have that accessibility issue tied to them.
I had some challenges during the iterations process. One of them was during the sketching process. I was leaning towards a specific design while drawing, and I ended up putting more effort into those ones than others. For the shirt design, I spent way more time on Number 2, than the others, even though it didn't win in a class vote. I spent too much time on them normally. Instead of them being sketches, they were fleshed out ideas. Another struggle I had with this was opening/closing doors to ideas and iterations that went deeper into detail. I had basically already put a lot of detail into my first iterations, and had to make an entirely new category instead of diving deeper into one design. I learned that iterations can be used to help you get all of your ideas out there in front of people, no matter if they're thought out or not. It was also a really cool way of actually designing my character, where I didn't choose the design myself, but looked at what the majority of people wanted to see on my character. For the hair iterations, design #1 won. For the teleporter iterations, design #3 won. For the shirt design iterations, #1 won.
This project is called The marble Olympics, and in it we used different forms of digital media to make a video parodying the Olympics. In it we have two different events; the relay race and the block pusher. My part was filming the marbles and making a stinger for the intro at the beginning of the video. The stinger I made was a glitch effect and I made it in After Effects. A good chunk of it was chunking some noise to make the blocks, then animate the contrast and make it look like it's moving. After that, I added color and made it look 3-dimensional. I think I got a feel for After Effects, as I had never really used it before. It was cool to be able to follow a tutorial (Video Copilot) and make something really cool that would give me practice for After Effects. i don't think the project itself was that time-effective, but the skills I learned in it will definitely useful.
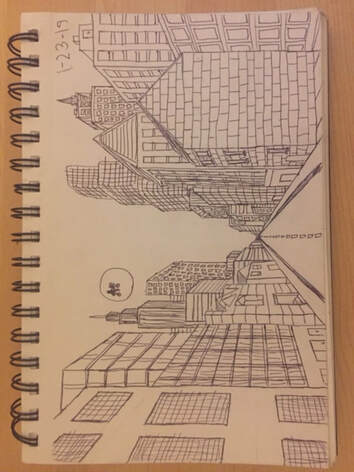
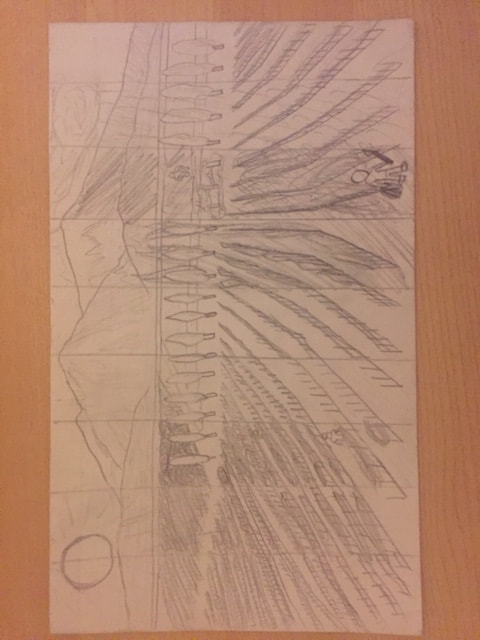
I am working on a shirt design, in my free time. It’s taken a lot of effort and time, and I could’ve finished earlier if I hadn’t procrastinated so much. Facing A Challenge It was difficult to get it started. I originally drew it for a D&D campaign, but that fell through and I had a left-over drawing. Another thing that was challenging was finding time to work on it. I was developing another D&D at the time, and I was conflicted on which project I should work on. Having A Go I took the time to finish this, instead of the D&D, because that was a bigger project. I devoted most of my free time to working on it. I began tracing the drawing in Illustrator, and this went on for a week or two. When I finished tracing I needed to invert the colors, some of the lines needed to be reverted to another color, and I couldn’t do that while they were in a Live Paint Group. Problem Solving I re-drew the lines that needed to change colors, and them accordingly. It took more time, but I think the outcome looks a lot better than it was before. Deep Learning I learned a lot of useful skills about Adobe Illustrator, and learned more on how the program and different tools I could use to help me. The scissor tool was a really useful tool, and helped me to cut out segments I didn’t want. I learned how to make your lines look a lot smoother and precise, too. Successful Learning I completed the project, and it felt really good. I was able to draw, trace, and shade the entire piece in a less than a month. I don’t think that's too impressive, and I could’ve finished it a lot earlier. But, I have a lot of other stuff going on, like school and work, so I thought it went well. Reflection and Value I think the most valuable part of this project was being able to work on it whenever you wanted, and not having a defined due date. It gave me a lot more creative freedom to not have other people working on the project with me.  Hello there. As I said in the previous blog post the design process and the Empathize, Define and Ideate phases, the design thinking process is healthier and more efficient way to find a solution to any problem, big or small. These last two parts of the phase, the Prototype and Test phases, are steps that are made to make your solution come to life and to make sure it works. Prototype: Our prototyping phase went two very different ways; one towards reducing morality rates from accidents, and making biking more appealing in Napa. Our first prototype was an innovation of a bike helmet. One that had pressure pads on the inside, to measure the g-forces inflicted on the wearer's head. If the g-force is high enough to cause damage to the head or cause an injury, it will signal to a 9-1-1 dispatch. There are motion sensors to tell if you are unconscious and a GPS so the paramedics would be able to reach you. I'll explain why that didn't work in the test phase. The second prototype was building more roadway for both the Napa River Trail and the Napa Valley Bike Trail. We were designing routes to connect both to each other, and connect those to the Oxbow Commons and the trail further downstream. The River Trail will continue to run along the river, and run through the Oxbow Preserve. It will connect to the Oxbow Commons through a bridge, then continue down to the Napa Valley Bike Trail. For The Bike Trail, it will continue to run beside the train tracks and go through the Oxbow Commons. Then, it will connect to the River Trail and the separate Bike Trail. We will also paint murals further uptown, in between California Blvd. and Pueblo St. To make the trails seem even more appealing to the community, we will run lights along both of the trails, so it will be lit at night. Test: For the helmet, there were a couple of things that got in the way; the how, and how it related to the project. We weren't technologically savvy enough to be able to create a helmet like that, and the helmet's design didn't math up with our problem statement. Our problem statement was to make biking safer and more comfortable, while the helmet was made to prevent fatalities and get paramedics to the sight faster. That's why we had to scratch that idea. The trail connector, however, we will be sticking with. It seems plausible, but there are a couple of constraints that will stop us from doing it. Constraint 1: Cost. It will be very expensive not only to make the trails with asphalt, which is relatively cheap, but also with hiring artists and putting up lights along the trail. Constraint 2: Permission. The River Trail runs along the banks of the river and in between private property. Further downstream, people have purchased land that goes all the way up to the banks of the river. We would need to sign contracts with everyone who owns land in the path stating that they would give up part of their land to help build this. Some people might agree, but some will not. The design process is a very creative and extremely good way to come up with solutions for a problem that you're facing, whether it's for an assignment or just solving a problem. There are 5 main steps to the design process are; Empathy, Define, Ideate, Prototype, and Test. Empathizing is getting to know the user better, and putting yourself in their shoes to better understand what the problem is. Defining is understanding the problem, then forming questions to help your research. And ideating is coming up with ideas based on the user's needs and the research you found. I'm only going to talk about Empathy, Define, and Ideate. As you can tell by the title, there will be a second part about the prototyping and testing. Empathy: As I said in the beginning, empathy is putting yourself in someone else's shoes, trying to understand what the problem is and what the user needs from the prototype. I learned how to feel how others feel, using interviews and empathy maps to get the most valuable information. I used a note catcher to get every piece of information that our interviewee said. Through that, I was able to see what the organization was trying to do, how they were doing it, and what got in their way. I think the hardest part of the Empathy stage was filling out the empathy map. It was split up into four different categories; Say, Do, Feel, Think. The Say and Do were easier to fill out, because all I had to do was look at her to see what body movements she made, and listen to what she was saying. the harder parts were the Think and Feel, because we had to interpret the information we got from the interview and turn that into emotions and thoughts that she had. 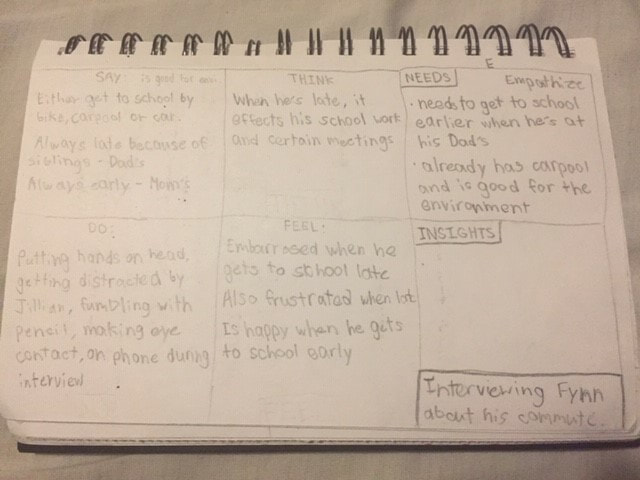 Define: The define process was one of the shorter processes, where we figured out what the problem was after getting the empathy stage done. Each group had to come up with a problem statement, a sentence that defined what needed to be done in the project. The way my team did was we looked through the interviewer notes and found phrases and ideas that were repeated multiple times. This is the problem statement we came up with; "The Napa Valley Bike Coalition needs to find a way to make biking safer, because conditions and the environment can affect a biker's comfort and experience." Ideate: When we first started the ideate phase, we already had ideas forming in our minds after we made the problem statement. We spent about 10 minutes writing every idea that came to our head, no matter how crazy or impossible it was. After that, we had a vote. We voted on the ideas that we wrote down based on which were more feasible, affordable, and effective. Once we narrowed them down to about 5 ideas, we different process to help expand our thinking process. We made constraints based on our research and interview notes, and tried to make changes to those ideas to conform to those constraints. One of those constraints was making a board game. We made a Jumanji-style board game, but instead of giving you riddles about jungle creatures, it gave you tips on the rules of the road, and different ways you can be safer on it. Another constraint was making a solution to the problem from a different time period. We set in the 1820's, and since there were no cars around, bike safety wasn't a problem. Bikes were just invented, so they were the new mode of transportation. We could've made a solution to help bikers from getting trampled by horse-drawn carriages, but I don't think that would've helped.  This project took a look at perspective and how it used in art. We did a lot of exercises from drawing cubes to draw a city street (below left). Perspective uses two main things to help it come together. The vantage point (where all of the lines lead to) and the horizon (used in landscape type work). perspective is an art form used by many artists to keep their work looking realistic and proportional. Perspective drawing is use for 3-D drawings, where an object that has depth can be seen. These tools help artists know where lines need to be placed, and how they want their perspective to look, whether it may be from above, below, or from the side. Our final goal was to make a perspective painting of a real place, where we wanted to install and art piece. I chose a wall on the side of a thrift store in the middle of downtown Lakeport, California. The goal was to find a site-specific space for our artwork to go, which was specific to a certain county. This project was a little challenging, because it was difficult for me to find the correct place to put the art piece, and it was difficult to draw in perspective and proportion. This project helped me learn how to draw 3-D images in perspective, using the vantage point tactic.
In this Computer Science project, we programmed robots to dance. The robots we used were Ollies, which are a brand of robots from Sphero. The programming was a lot like Scratch, where there were blocks that we moved into a space to help program the robots. The song we chose to dance to was Dancing Queen by ABBA. I thought it was really fun to do this project because I got to chose one of my favorite songs and code a robot to dance to it. I was also able to see how the program we made was perfectly timed up to the song, and we were able to make the dance vary based on what was happening in the song. It was fun to watch the robots dance to the songs, and watch what other groups made for their dance. To me, the project wasn't too difficult, but there were a couple of challenges. The first was choosing the song. It took us a while to figure out the song we wanted to use, and we eventually went with Dancing Queen. Another thing that was difficult was matching my coding to my teammates', so that the robots would do the same thing.
In this project, we made a video game using the Scratch coding website. The goal was to make a game that had music, sound, scoring and increasing difficulty. I think I did pretty well with all of those. The title screen contains the Galaga opening theme, and there are sound effects for the bullets that are shot. The goal of the game is to shoot bags to destroy them, and that is what is being scored. Every bag you shoot gives you a point. There is also increasing difficulty. There are three stages, and each stage has a ring that blocks the bullet. The holes in the rings get smaller and smaller as the stages get harder. My game meets all of the requirements that it needs to. I think that the challenges I faced with the game was definitely the coding. I had never worked with coding before, so it was difficult to start out the game. The other issue I had was the infinite bag glitch, where when a certain button was pressed, a ton of targets started to appear, and made the game lag. I fixed the problem by giving the spawning of the bags a timer and only letting it happen when something else happens, like if the score is high enough. To me, this project was really fun and I learned a lot about coding in Scratch.
Galaga 500 https://scratch.mit.edu/projects/294372421/ For this project, we had to build a robot and program it to do different tasks. One of the tasks was to build and program a parade float and have it follow a white line. Another task is to rebuild the robot to be sturdier and program it to push other robots off of a table. The last task was to modify my robot to climb up the leg of a table. 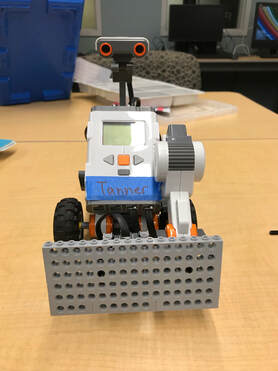 Through this project, I learned how to use basic coding to program a robot, using moving commands and commands that applied to only certain parts of the robot. I thought it was really fun to be able to do different tasks with the robot, and seeing the product that you and other people made. My favorite part was the sumo wrestling, where we had to push another robot off of the table. The challenging parts of the project we in the beginning, where we had to learn how the program works and what does what.
One lesson I learned throughout this project was being able to communicate with my partners, and realizing how important it is to have that communication. We were able to discuss multiple things, like due dates, what everyone needed to get done and how, and where everyone was on getting everything done. It was really helpful being able to help my partners stay on task and have them help me stay on task as well. Another thing I learned from this project was being able to take away data from research and apply that to something in the project. I was able to find data on the demographics and fire severity, and I was able to connect those to how it related to my project.
Here is the link. The art project we did for the Recuerdame project was a Self-Portrait project. We had to make a self-portrait of ourselves using multiples types of media, including collage, paint, pencil, etc. My goal for this project was to make a self-portrait that describes me a little bit and shows what I like. For the first part of the project, we drew ourselves using pencils. I think I did a really good job on that and a lot of people said it looked like me. I didn't use the lines that are supposed to go across the face to measure everything, I just eyeballed it and drew what I saw in the mirror. I think the most challenging part about that was drawing my mouth. I feel like I couldn't get the proportion right and I could've done a better job on that. Otherwise, I thought it looked good. 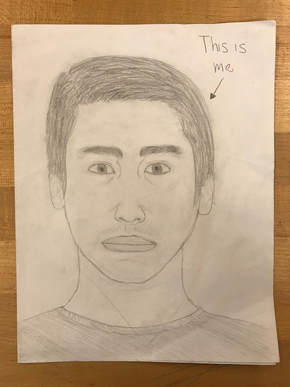 The thumbnails were an easy process for me because I had already known what I wanted to do for my project, I just needed to come up with a couple of others to fill in for the assignment. I had one where I was almost invisible and there was a outline of my head. One of them had me sticking my head through paper, with my body on the other side. The last one was me surrounded by video game characters, which is the one I ultimately went with. The mixed media self-portrait I made looks good in my opinion. I am in the middle dressed up as a video game character, known as Sans. Around me are elements from other video games, like Pac-Man and Blinky from Pac-Man, the starship from Galaga and the portals from Portal. The reason I picked Sans as the character I am portrayed as is because I feel like I can somewhat relate to him. He’s sarcastic sometimes, so am I. He likes to tell jokes and I do too. He’s laid-back and carefree. I am… to a certain extent. He almost always smiles and I do too. 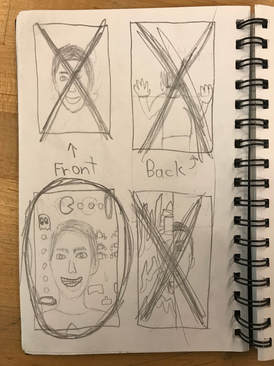 The reason I chose video games over everything else was because some of the time I don’t feel like I can express my personality that well. There’s not much to express either. I am what you see. I put video games in there, like my name tag project, because it’s something I really enjoy. I don’t really express my personality that well and that’s why I made video game characters. The reason Sans is in there is because I thought of it while I was making my self-portrait. I was originally going to cut the eyes out and put something else in, but I didn’t know what. That’s when I thought of Sans and how hey has one blue eye. So I started going with it. The eye part was supposed to be a joke, but it blew up and now it’s just a part of my portrait. The materials I chose to use were markers, pencil and paper. I used the paper for everything, including Pac-Man and the Galaga ship. I used the markers and pencils to color in or draw some of my shapes. I drew the hoodie and the smile on me, and I colored in Blinky and my hoodie. 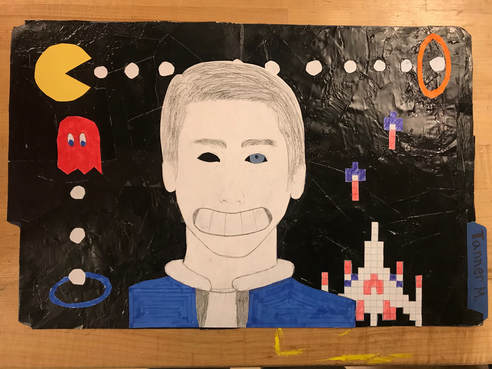 I think that my art piece shows a couple of different elements of art / principles of design. The first one is space. I feel like I used space based on how I positioned some of the video game characters. They are smaller than they are supposed to be, signifying that it’s behind me. The Galaga ship is even being cut off a bit by my shoulder. Another one I used was proportion. I think I did a really good job at making sure all of my facial features were the right size and that they weren’t exaggerated or overlooked (expect the mouth). I did pretty well at sizing up my face and making the right size in relation to each facial feature. The last element / principle I used was unity. The portrait doesn’t look like somebody just pasted a bunch of images to paper. It looks like it was planned out, and that everything fits together nicely. I looks like all of those are supposed to be there, and not a mixing pot of images I found in magazines.
When I got feedback, there were a couple of things I needed to work on. I needed to add images, which I did. I also was told to fix the grammar mistakes I had in my essay. I only had 1 grammar mistake and I fixed it. I also needed to reflect on feedback, but I couldn't do that yet because I didn't get any feedback. Now that I have feedback, I'm able to critique my work based off of it. |